After some pressure to get people into my model rail, I took a look at some pre-moulded figures.
A small selection of unpainted people works out around £6 for a pack of ten. Sure, there are more on Amazon and elsewhere, but I’m keen to use this as an opportunity to learn, and create custom poses.
Enter MakeHuman, a fantastic resource for creating 3d models of people, with many of the base models CC0 (essentially a do-as-you-want licence). The same community has also built a Blender extension, which means you can create models right in Blender.
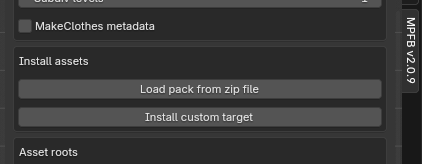
Installation in Blender 4 is pretty easy – you drag the file directly in and it loads itself. There’s a bit more work to do with assets (such as poses, body elements and clothes).
It’s a bit buried in the new tab that is created in Blender’s main view, under Apply Assets > Library Settings, then under Install assets. You’ll want to ‘Load pack from zip file’ for each of the assets you choose to use.
Create a Human
Creating a human is only a few clicks, although it’s easy to get lost in the complex (and very capable) menus. New Human > From scratch then Create Human. Plenty of options to choose from.
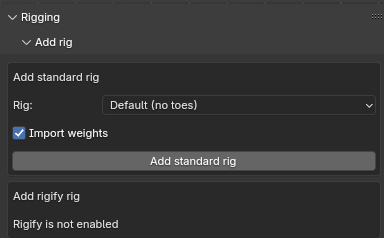
The next stage is to create a rig. You’ll need this to manage your human’s pose. By default this creates a simple rig that allows you to control arms, legs and head.
This is in Rigging > Add rig and (with the model selected) Add standard Rig.
From this point, you can load poses, clothes and other assets for incorporation into the model.
Scaling
OO gauge is 1:76, which means a foot in real life is 4mm in scaled down version. That should be fairly straightforward to scale in either Blender or your slicer of choice for 3D printing – it’s a scale of 0.0132
Outcome
Very easy to put together in Blender, although I need to learn more about posing to get away from the standard packages (which strangely don’t seem to have any standing poses).
And the output is … fine. Not great, but I’ve not taken any care with the printing or supports. I created a little stand for the character to sit on, and all seems to work well! Total time from start to print-out was easily less than an hour, very much benefitting from MakeHuman.
Just prior to Christmas, I was gifted a model railway. Not something I ever thought I’d take seriously, but here we are a few months later and I can safely say I’m hooked.
Specifically, it was the intersection of microcontrollers, automation and electronics that piqued my interest. Building things that move, with some vague sense of reality.
I’ve neglected to write up much of my progress so far, as I try to get to grips with the most basic terminology. It’s a ‘double-O’ gauge, which means 4mm is a foot in real life. Control-wise, it’s a fairly basic kit. Power goes in, train moves. But as I get to grips with the possibilities, I thought I’d write up some notes here.
Choo-Choo
The power supply is fairly straightforward. 12v DC (actually a bit higher) is supplied to one track, and return on the other. The train picks up the power via its wheels and uses this to drive the motor, which makes it go round. Drop the voltage a bit and the train slows down. Reverse the polarity and it reverses.
Given the whole track needs to be powered at once, with some losses between the connection and the train, it’s often a bit higher than 12v.
I have 4 locomotives to play around with, and a variety of carriages. This creates the first challenge. Stick a couple of trains on a loop and they’ll invariably go round together. One will be faster/lighter/geared differently to the other so invariably at some point they’ll mate or crash.
One solution to this is a system called DCC, which uses pulse-width modulation to send data alongside power to individual trains. This requires some extra smarts on each train and – while you can retrofit them – it all sounds a bit fiddly.
The cheaper solution
Actually I’m not sure this is cheaper in the long run, but bear with me.
One thing I’ve learnt very quickly is that model trains (particularly the locomotives) are expensive. I’ve no doubt that’s because of the delicate electronics inside. For my stage of learning though, I’d prefer cheap second-hand over whizzy brand new. Besides, where’s the fun in buying a ready-made solution when you can reinvent the wheel make it yourself?
Signals
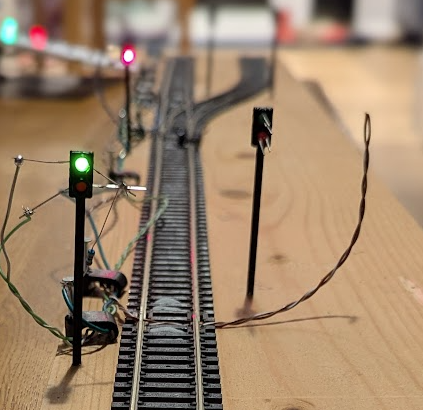
First thing’s first, I want to have signals. A simple red/green set at first; we can improve on this later.
To the surprise of presumably nobody, red means stop; green means go. A simple two light (or aspect) signal should be enough to get us going (or stopped…). There are more complex light combinations, including single yellow, double yellow, and even exotic flashing lights, but let’s keep it basic for now.
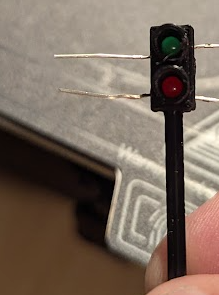
With a couple of LEDs and a 3d printed signal structure, I’ve got the starts of a signal.
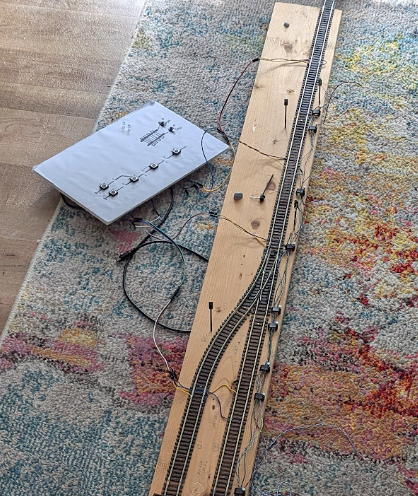
A few more printed, and some indelicate soldering, and I have several signals ready to go. To control, these, I create a prototype board with some switches and wire them up.
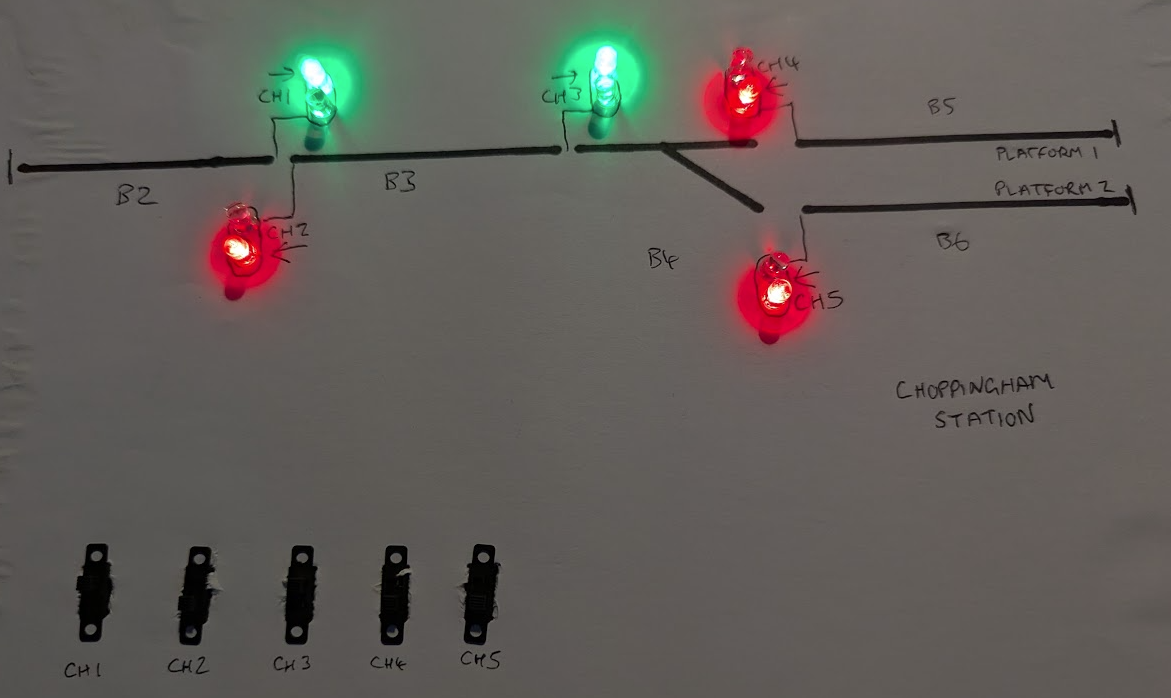
My controller board. Each switch controls a corresponding signal on the actual track, as well as the display shown here. Choppingham station is fictional, named only because I’d just had a ham sandwich at the time.Here are the signals on the track. I can flip them between red and green at my leisure.
With all five signals in place, I could control them individually. Concept proven, it’s on to microcontrollers (a future post…).
Moving Trains
Getting trains to move proved a little tricky at first, and here I learnt very quickly how small motors deal disproportionately with physics, namely friction & inertia. The best I can put it is this: compared to their full-size equivalents, model trains start and stop abruptly.
It can seem quite unrealistic, and it also seems model rail people (modellers?) spend quite a bit of time trying to overcome this. I’m not sure if DCC manages this well.
I’m not sure if anything I’ve written here is accurate, so don’t use it as reference.
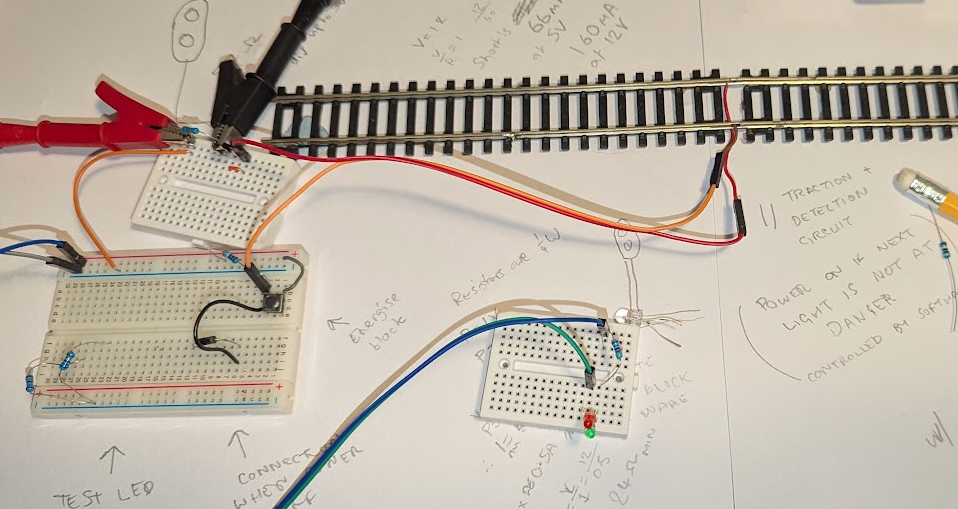
The track on a basic model railway is electrically continuous. Little metal connectors ensure power is transferred between successive pieces of track and the train can run between them. However, this also means all trains run the same way at the same time.
To get my trains moving with some degree of control I broke the track down into blocks. This is somewhat similar to real-life railways, although in that sense ‘blocks’ are more for signals than powering trains directly. Still, for most activity it’s not too dissimilar a concept.
Five blocks of track controlled by five pushbuttons.
To get my trains in motion, I wired each block separately. At a push of a button, I could energise each section of track and any train on it would move accordingly.
It was crude, fiddly, but – damnit – it worked.
Next Steps
As far as power and signals are concerned, I managed to establish a way forward quite quickly.
I’ve now got both power and signals controlled by microcontrollers, meaning I can (for instance) set signals via a web interface, start and stop trains, and even control their speed.
This is a lot more advanced than I’ve documented so far, so my plan is to write up each stage as I reach a milestone.
If you’re interested in more, please consider bookmarking this site!
In a terminal, sudo apt install python-is-python3 python3-venv
Open up VS Code, hit Shift + Ctrl + X and install PlatformIO IDE.
For a while, the PlatformIO installer was complaining about Python3.6+ interpreter not working. it seems it was actually specifically looking for venv. Once I installed that, it worked fine.
Urban sensor networks often have to deal with a particular challenge: how to get data from the device to a server. Depending on your budget and data needs, there are various options, from low-power wide area networks (LP-WANs such as LoRaWAN) to cellular modems.
Rain gauge, river, temperature and other sensors might typically send a tiny amount of data periodically, a single measurement every 10 minutes for example.
Low-power networks are ideal, but require some form of network to get the data from the device to a gateway, and ultimately on to a server. There are lots of efforts to create community networks, such as The Things Network, but they’re by no means universal.
Building a sensor with a cheap (think $2) ESP device1 is relatively easy, and typically come with wi-fi. LoRA hats and antennae add to the cost – admittedly they seem to have come down since I last looked a few years ago – this one’s about £14.
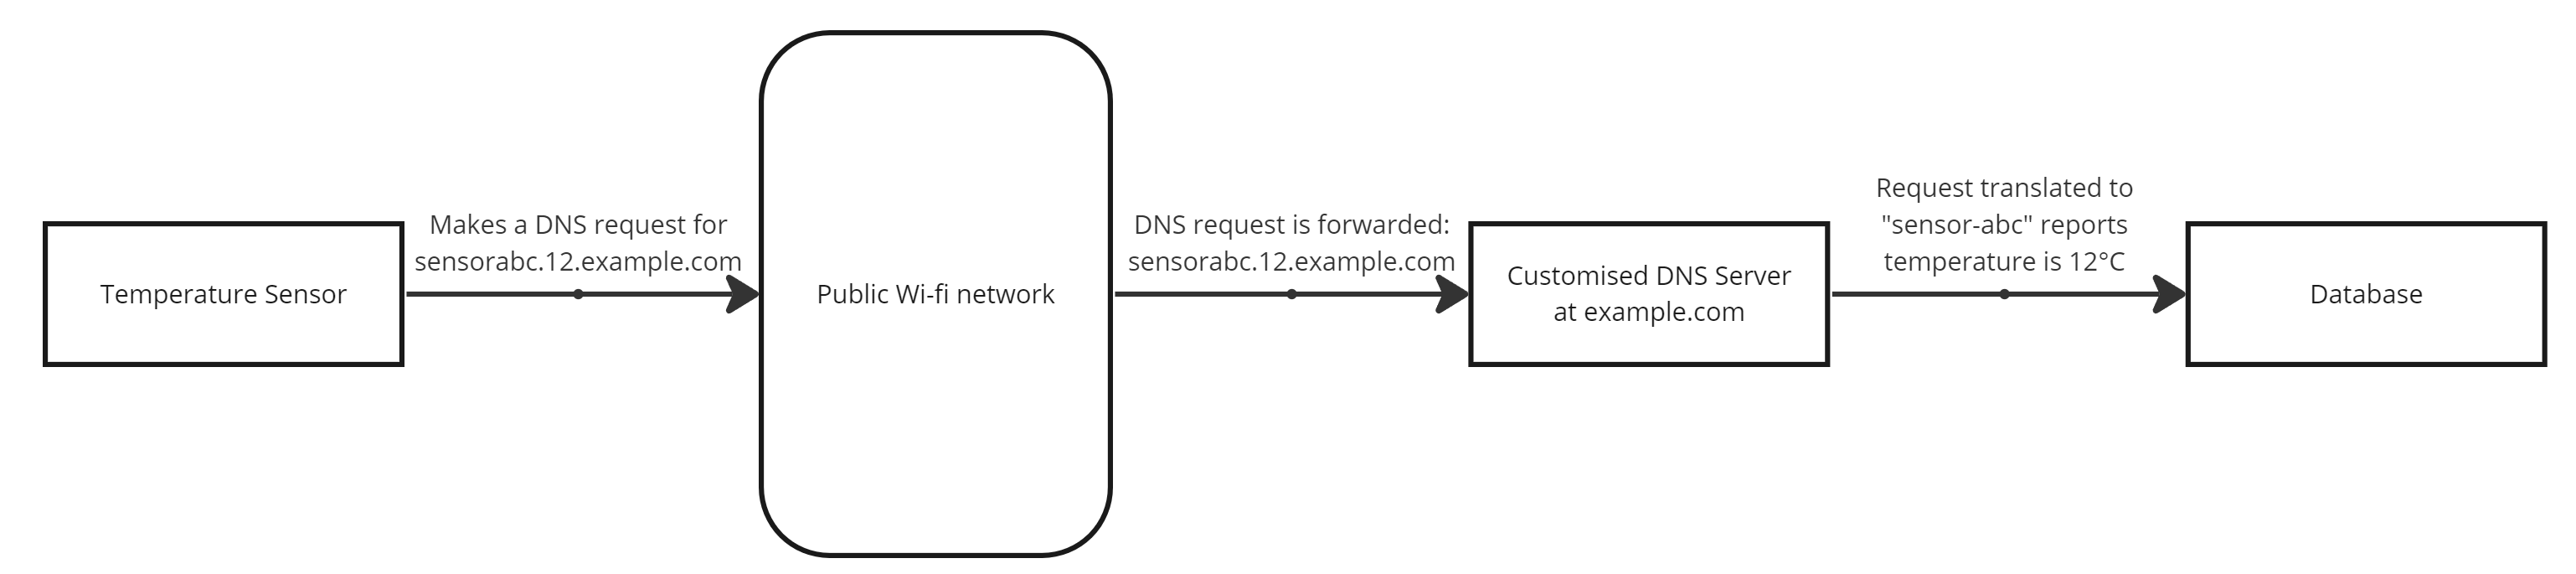
Given that wi-fi is pretty ubiquitous in urban areas, couldn’t we leverage this to send data? Enter DNS Tunnelling. I first read about this years ago when a proof of concept was developed to tunnel regular traffic over DNS – a potential way to gain Internet access without signing over your personal details to public wi-fi networks.
DNS Tunnelling takes advantage of the fact that – although public wi-fi networks typically intercept web browsing (to block you until you agree to terms), they can’t reliably block DNS without breaking a whole bunch of browser functionality in the process.
So, theoretically, a device could connect to a public wi-fi network, send its data via DNS, receive instructions (in the DNS reply, if needed) and disconnect again, all without having to navigate login screens and minimising traffic.
A simple example of a temperature sensor reporting its reading via a public wi-fi network
I started to look into this during my time working on IoT devices, as it would have significant cost benefits versus rolling out low-power networks or subscription cellular services.
A network of this type requires two key items: a device that can find and connect to public wi-fi networks (relatively easy with Arduino, Raspberry Pi, etc.), and a DNS server on the Internet capable of translating requests into specific packets of data (variousoptions are ripe for modification).
However, there are significant implications around using public networks in this way, which I’d never explored fully before I left this particular project. Although I do wonder whether network operators would cause a fuss over a few kilobytes of data, in the context of urban city-wide public wi-fi installations. So, while my closed tests appeared to suggest it would work quite well, a rollout of any kind would need to be properly scrutinised and sanctioned by the operators.
Nonetheless, communications remains a major factor – particularly around low-budget sensor networks. Although it seems costs are falling, coverage is improving and – if you are building out a low-power network – consider the added benefits of joining one of the various networks to pool resources.
Yes, I know a $2 device isn’t going to have the best antenna, although still potentially good enough for this to work in many locations. ↩︎
Many production and supply chains have some form of retooling cost. Software is similar. It takes times to set up a development environment, ensure consistency and remind oneself of the work context.
A few years ago, I spent most days writing code in one form or another for broadly related projected. More recently, it’s become an occasional foray, and quite scattered, so retooling has been more of a concern. The overhead of setting up my workspace, just to get a potentially small change made, is more significant.
Various options, contributions and ways of working have emerged over the years. From synced profiles, config inside projects and easier setups. Containerisation lends itself well to the development space, as do virtual environments, virtual machines, and so on.
Github Codespaces is an interesting and potent take on this. It effectively bundles the editor, working space, source control and developer testing. Of course, as part of Github, it also brings closer the wider sphere of testing and deployment.
I’m now revisiting my ways of working to make the most of Github Codespaces, pushing myself towards one-click editing, simplified self-test and deployment. Crucially, it means that the wider dev environment is fully configurable and cloud-based, so I don’t need to have a desktop set up with all the requisite tools – a browser is enough.
It’s also giving new life to old kit. I’m using older devices that would ordinarily have been sent for recycling. Equally, the pressure is off to invest in something new.
A quick rattle through some other benefits:
Codespaces can be ephemeral, and I’ve specifically reduced their lifespan. This encourages regular commits, and thinking about clean deployments more routinely.
The entire dev environment is configured inside the repository in Github, so I know every contributor has a like-for-like place to work. That reduces errors.
Security is a potential winner, in various ways, but as usual there are pros, cons and professional factors to consider that are worth exploring separately.
Ultimately, it means I can pick up a project, make a needed change, and create a commit in a significantly faster way.
This blog has been going for about 20 years. Various iterations of WordPress, a custom CMS, back to WordPress again.
It’s not my first blog. That was running all the way back in the 90s, before blogs were really a thing. I’ve lost most of it but I remember it was based on hand-editing HTML files in Vim. Posts were still dated, sorted by latest and contained various updates. Just seemed like a natural way to track updates at the time.
I’ve probably been responsible for the creation of upwards of a hundred websites so far. From personal projects, commercial ones, customer sites, intranets and hobbies. Many of the commercial ones still exist, although my work has largely been overwritten.
I have also created websites that create other websites. Building content management systems and blog engines. If I count those, there’s probably a few more hundred. Sadly all of those disappeared, along with the companies that I worked for that hosted them.
Along the way I’ve tried to adhere to principles based on well-established concepts. Good stable URLs, minimal overhead, decent semantics. It’s helped me steer clear of some of the fads over time, like single-page content sites.
Many of those principles have come from managing the back-end. I’ve created websites attracting millions of users, sometimes in a very short time. This firmly focuses the mind on responsiveness: avoid dynamic pages, minimise bytes, cache smart.
More recently, static website generators have caught my mind. These aren’t new. I build a couple of iterations back in the 90s – desktop apps that produced static HTML with a template. Nowadays this works well with source control and CI/CD, so a site can be edited in GitHub, prepared by Actions and deployed to a server.
Static websites are pretty much the fastest kind. No real processing on the client or the server, lots of cache opportunities, robust. For a blog – particularly one like this that isn’t that fussed on user comments – they’re almost a no-brainer. Why re-render the page for every user when they each receive the same content? There’s quite a number of static site generators, and I’ve been using Jekyll for a while.
All good in principle, but it’s not enough. It misses some of the interesting – and oft-forgotten – aspects of the web.
What about redirects? This is a server configuration challenge – Apache lets you use .htaccess files but that might be inefficient. Nginx needs to be configured. Others have in-between implementations.
What about content negotiation? I’m quite interested in this, because the transfer of knowledge shouldn’t assume HTML. Want this in JSON? Fine. After text? Why not. PNG image? Well, that’s a bit strange but yeah let’s give it a go.
Language negotiation? Sure, why not. Apache kind-of supports this (as well as content) and you end up with various versions of the same file, so intro.en.html and intro.fr.json – the server handles the selection, so this kind of feels like a good outcome even if our generation gets a little more complex.
As the World Wide Web is well into its thirties as I write, some aspects keep coming round. Maybe that suggests they have a relevance that we shouldn’t let go of; that original intentions and designs were good or – at least – grounded in reasonable premises.
I’ve neglected blogging for a number of years. Bit of a shame, as I think I’ve had plenty of contributions to make in that time. Blogging, writing, everything is a habit.
With all the activity around Twitter, I’m less minded to post there. I’m not inclined to go to Threads, or Mastodon, or any of the other social media platforms. Hosting my thoughts here has a renewed appeal.
I don’t mind if 5, 50 or 5000 people read this – or none at all – writing in this way is a means to release ideas brewing and trapped in my head.
With that in mind, here are some things I want to write about, to describe my journeys. I aim to teach and support. Maybe they’ll be useful to you as well:
Document my adventures, including new frameworks, practises, lessons learnt.
Convert this blog to some kind of static generated site.
Talk about what I’m learning with 3D printing.
Record my travels.
So, there’s my starter for ten. I’ve promised this before and ran out of steam fairly quickly. Let’s see how this goes….
It seems this one has a bit of fame. The “real Schlenkerla smoked beer” certainly doesn’t disappoint. It’s how I’d imagine kissing an ashtray. The smokiness comes through immediately and throughout and – if I dare to say – overpowers much of the remaining beer taste.
Not sure I’ll be back to this one in a hurry. The novelty wore off quickly, and it wasn’t the most pleasant to drink. Still, good as a reminder of some of the more extreme flavours out there.
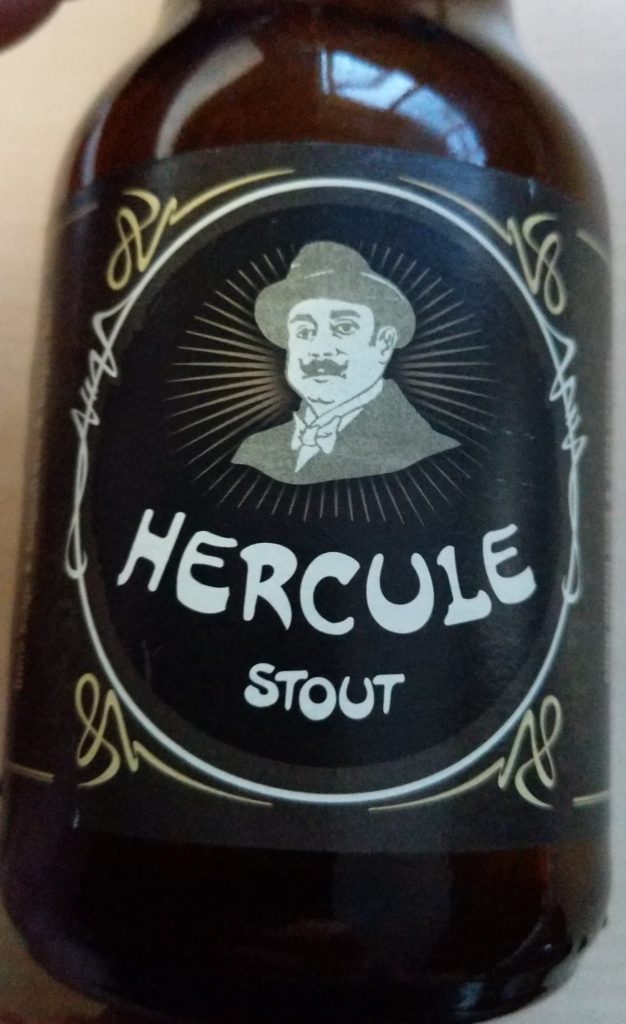
Named after the Belgian detective, Hercule Poirot, this has been on my to try list for a while.
It’s a decent stout with a nice, dark flavour. Reminds me of chocolate, coffee bitterness which works well. Slightly stronger at 9% ABV. I’d certainly be happy to add this to the regular rotation when it becomes available.