Huawei E3131

It seems like I’m having mixed success with devices at the moment. To be fair, this one isn’t a product mismatch but a manufacturer issue, and thankfully seems fairly easy to get around.

This post is as much a personal note/reminder as anything else. If anybody needs detailed notes please drop me a line 🙂

The Huawei E3131 has been a pretty good 3G modem for the Raspberry Pi. After a bit of hacking about, it lights up and connects to the Internet.

The first batch (black cover in the photo) I bought worked as follows:

IMG_20151003_154035A network interface appears on eth1. The Pi gets an IP address 192.168.1.5 and the modem appears as 192.168.1.1. The modem has a mini web server which can be interrogated to control & get information about the connection.

The latest batch (white ones) work as follows:

Network interface is now on 192.168.8.100 and the modem is on 192.168.8.1. The web server still works, but it has some kind of basic security mechanism built into it, so you need to get a token first.

The original device had a USB id of 12d1:14db; the newer ones have a USB id of 12d1:14dc

So, not only has the IP address/local interface changed but there’s a new security mechanism involved. Time for some extra work!

Useful links

http://tjworld.net/wiki/Huawei/E3131UsbHspa

http://www.3g-modem-wiki.com/page/Huawei+E3131

Update: Looks like it validates the Referer field, perhaps for cross-site protection – I set it to http://192.168.8.1/html/index.html and requests work now.

Raspberry Pi Wifi Dongle on Amazon

Slightly annoyed to discover that my most recent batch of USB wifi adapters, sold as “for Raspberry Pi” are not quite compatible.

For my various wifi projects, I’ve been buying up lots of little wifi adapters. All are labelled in the same way “USB Wifi Adapters for the Raspberry Pi – By New IT”. It looks like they’re all based on this from supplier ‘New IMG_20150927_095541IT’ (whom I’ve no reason to believe are involved in the issues here).

The first few batches worked exactly as I wanted. Plug and play.

The most recent batch has, however, been an entirely different story. They’re simply different.

The picture shows two USB devices. On the left is the most recent, non-working device. On the right is the working device. The most notable difference is the ‘802.11n’ label is on a different side for each.

What’s the difference?

It’s all in the internals. Despite there being hundreds of wifi products they’re all based on a surprisingly small number of variants.

The working version is based on a chipset from Ralink, the RT5370. This works out of the box for the Raspberry Pi, seems to be a good performer, and – crucially for me – supports monitor mode (so it can act as an access point too).

The problematic version uses the Ralink 8188 (RT8188) chipset. This doesn’t have full support in the Raspberry Pi, and frankly it’s been a pain in the backside to work with. I have a box full of old USB wifi dongles; most seem to be based on RT8188 and never really had much luck with them.

It’s possible to get them up and running, by compiling special drivers, but frankly it isn’t worth the effort and I’ve had lots of memory leaks and other issues with them.

Be careful what you buy

So, back to Amazon. It seems that some devices sold as ‘for Raspberry Pi’ are in fact not ideal – and take a lot of work to get going. This shows up in the reviews as it looks like a few people have been stung.

The whole thing isn’t helped by Amazon’s peculiar supplier system, where it opts for the cheapest supplier based on the product you choose. It looks like one or two suppliers have these RT8188 chips and are selling them under the wrong label – no idea if intentional or not.

Thankfully it’s fairly easy to pick the right supplier. Make sure you choose ‘New IT’. I’ve just ordered another four devices from them and they work fine, straight out of the box, for the Raspberry Pi. Yes, they’re a bit more expensive but they work!

Now to decide whether it’s worth my effort negotiating Amazon’s support line and sending the two dud devices back…

Wifi Visitor Counting

It’s been a little while since my last post about visitor tracking, and some updates are long overdue.

The good news is that it’s ready to launch, with lots of interest. This has been a challenging project in many respects, and I’ll be documenting the various aspects shortly.

Initial results are very promising. We’re seeing figures that have never before been seen; stats and information that were until now completely invisible. It’s thrown up issues, about data transfer, privacy and many other factors.

Privacy is a huge issue for me – there are lots of companies that (in my mind) are far too aggressive on this issue – so expect more on this as I continue to share my work.

It’s exciting stuff, and I’m keen to share my experiences and thoughts for others. Stay tuned!

Avoiding SD Card Corruption on a Raspberry Pi

As part of my visitor mapping project, the bulk of my time has been spent throwing curse words at the SD cards.

Raspberry Pis depend on SD cards. There’s little other choice. More specifically, the newer devices use Micro SD cards. It’s fairly incredible to realise just how much data can be stored on something around the size of a thumbnail, but I digress.

The problem with these cards (& flash memory in general) is that they’re very sensitive to corruption. Any power fluctuation or problem writing is a potential problem, with a real chance that the next boot will end in failure/disaster.

In my experience (ten devices in lab conditions; regular reboots) failure rate was as high as one in ten reboots. Slightly oddly, software resets (i.e. rebooting from the command line) appeared to fail more often than unpredictable power loss.

Read-Only is a winner

There is a way to boot a Raspberry Pi in read-only mode, although it requires a bit of care. I found a couple of ways to do this, by editing the boot config file and by setting the fstab to boot as read only.

The consequences are hopefully clear – nothing is retained. However, it’s also possible to temporarily remount the file system in writeable mode (and revert shortly after). My software is capable of self-updating, and writes its logs to the filesystem in case of Internet problems. Both work very well.

This website gave the best instructions. It includes removing a bunch of daemons that – frankly – I had no need for. I also removed fake-hwclock (for reasons which I’ll describe on another post) and preferred mounting ramfs on places like /var/log/ over linking.

The results have been pretty impressive. Since switching to this method I haven’t had a single corruption issue (despite many tens of reboots)

Power is a concern

I suspect that one of the big problems is power, and began testing with a voltmeter. My suspicion is that brownouts – i.e. dips in power – were causing reboots and corruption.

The latest Raspberry Pi hardware supports a configuration that boosts the current to USB drives. Setting max_usb_current=1 in /boot/config.txt appears to increase the per-device supply to 1.2A which avoids many of the power-related issues on high-demand peripherals.

My non-scientific and unmeasured experience confirms this. I’ve seen much better performance and reliability as a result, and – although can’t be sure – I suspect this has helped the SD card woes as well.

In any case – touch wood and all that – this appears to have solved the corruption issues.

Tracking Devices via Raspberry Pi (Part Two)

In the last post I described how it could be possible to build a simple tracking device using a Raspberry Pi acting as a wireless network access point. In this post, I try it out for real. This isn’t a detailed technical run-down, just the basics.

IMG_20140325_105251

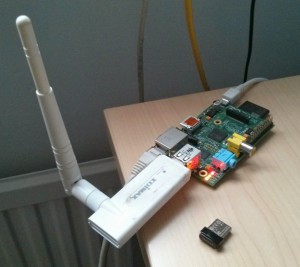
It seems to get this working you’ll need just a Raspberry Pi (Model B has extra USB + LAN so is easier to configure) and a USB Wireless dongle. I started off with the Nano-USB TP-Link WN725N but this isn’t supported by the default drivers. I managed to get it working thanks to this thread on the Pi forums, which describes recompiling direct from Realtek’s website.

However, it seems that the Realtek drivers don’t have the necessary hooks for responding to probe requests. My guess is this is usually handled at a lower level and hostapd merely makes use of callbacks to customise the handling of these requests. I didn’t really fancy rewriting large chunks of code to support it, so I opted for Plan B, which is an Edimax 7711USn (the big white thing in the picture).

The Edimax does seem to work with the default nl80211 drivers and sure enough, when I fired up debug mode, the probe requests came through.

By default, the probe requests only appear with some really high debug level (makes sense – they’re usually not that useful) and running in this mode would surely generate a whole load of debug messages I wouldn’t need. The second snag is that there is no timestamp with these messages.

So, next step was to recompile hostapd with some customisations. At this stage, I merely wanted proof-of-concept so I moved the probe request notifications up to INFO level and added a timestamp using some existing functions. I then ran the program for a little while et voila, the requests started coming in. The screenshot below shows the requests being made (MAC address partially obscured) and the timestamp (a second counter).

probereq

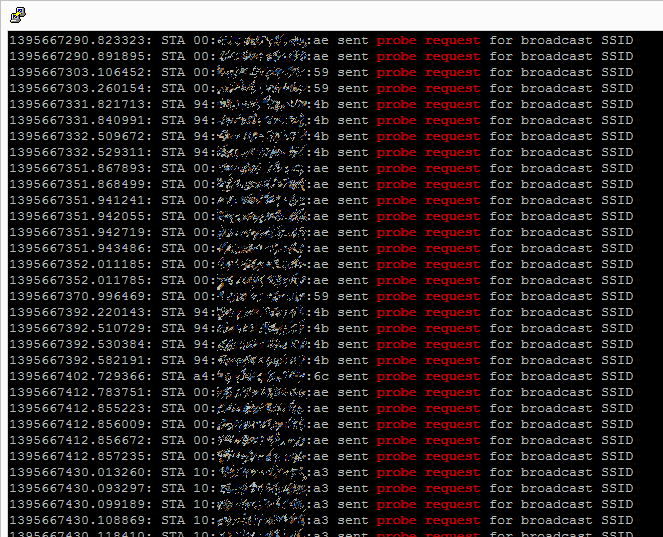
These requests will be coming from all sorts of wifi-enabled devices: my phone, my laptop, phones of passers-by. The key thing is that I did nothing to these devices to enable this – they automatically scan for wifi networks and this device is merely visualising it.

In little under forty minutes there were 1720 probe requests from sixteen separate devices. I’d call that a proven concept.

All in, the Raspberry Pi setup cost around thirty pounds. This is for a single device. My original plan was to see how this could be used for tracing paths through a space, such as a city or stadium. For this to work, one would need many more devices, both to triangulate the devices and to provide blanket wifi coverage.

The theory is: with enough of these devices in the right place it should be possible with reasonable accuracy to work out where people are, and where they go. At thirty quid* a pop, this needn’t be a hugely expensive task.

As it turns out, this is precisely the sort of work going on both in the commercial and development world:

CreepyDOL is a networked tracking tool – sniffs network traffic and tracks users. As the name suggests, the powers ‘in the wrong hands’ are creepy indeed.

Wifi tracking of the kind I describe has been in use for a couple of years now, and it’s already used to track customers in supermarkets.

Sure enough, just as I was working on my project, The Register published an article about how Asda and EE in the UK are using wifi to achieve precisely this.


There are quite obvious privacy implications to all of this. MAC addresses are unique and, even if we can’t directly identify someone from them, it may be possible to get their identity from all the clues available (such as where they shop, where they dwell, and by sniffing wifi traffic). Privacy is a huge concern and any technique such as this – even if used with the best intentions and no direct logging – must still be dealt with with care. Last year, it was widely reported that wifi trackers were embedded in some of London’s bins. Officials ordered the company to stop amid privacy concerns, and – despite the company’s protestations that all is anonymous – it has clearly hit a nerve with privacy advocates. There may well be no attempt whatsoever to track individuals, but a poorly executed plan will be met with harsh criticism irrespective of the actual risks.

I have a couple more articles planned to follow up these points – any comments are most welcome.

* There are, of course, all kinds of additional costs: You probably want a case, decent power, and public liability insurance. The Raspberry Pi is also not likely to be a great choice in the long run, for reasons which I hope to pick up later.

Using Raspberry Pi Access Point to Track Devices

I’ve been looking recently at ways to measure population movements across a large outdoor area. There are various ways of doing this: we watch them, we ask them, or we infer. Watching is a popular option at stadia, city centres and large events. Automated footfall cameras can track movements and figure out how many people walk past a certain point in any period. Put enough cameras up and you can get a pretty good plan.

However, this merely measures numbers of people. There is no connectivity. 200 people walk past point A, 400 past point B. Does that mean 600 in total at two locations, or did some of those in point A also walk past point B?

This got me thinking about technical solutions (of course) and fairly quickly I got to wireless networks. Back in 2008, I wrote about a scheme in Portsmouth’s Gunwharf Quays to track mobile devices. At the time I think the company was using bluetooth but since then we’ve had an astounding growth in smartphone usage. Wifi is pretty much standard and – I would perhaps wager – more likely to be turned on.

Keen to see how this might be implemented, I did some research into how mobile phones discover wifi networks and found an interesting behaviour. Every few seconds or minutes, your phone will send out a signal “who’s there” to probe local wifi networks. Any active access points will respond accordingly with their network name “Hi I’m BtHub_12345”. This surprised me a little, as the device itself has to ask for wifi – I was expecting the access points to broadcast themselves and send out signals every few seconds. It seems this is to conserve battery.

Anyway, having established this, it seemed likely the device would be giving its MAC address away. To clarify, the MAC address is the hardware-level identifier for network devices. It’s a bit like a serial number, so when two devices talk to each other they address each other by their MAC address so they know who’s who. MAC addresses are supposed to be unique, so no two devices should ever have the same address.

Curious to see how easy this would be, I have started to build a Raspberry Pi device that is capable of this. It seems possible – hostapd allows the Pi to act as a wifi network access point. This forms the basis for tools such as Karma (which achieves a lot more than I need) and clearly has the capability to show probe requests

There are also some privacy issues that need to be tackled. What are the legal aspects of tracking MAC addresses? It seems that, provided the addresses are not tied to individuals, we do not need disclosure. Indeed, my aim is to aggregate data from the start. Once a path has been created, any trackable information should likely be discarded. I’ll touch on these too.

More updates to come…


Resize partition to fit SD card [Raspberry Pi]

I often need this… originally from tomahhunt on the Arch Linux forums

The following commands resize the main partition of a new Arch Linux installation on a Raspberry Pi to fit the full disk.

Switch to root (sudo or su)
fdisk /dev/mmcblk0

Delete the second partition /dev/mmcblk0p2:
d > 2

Create a new primary partition and use default sizes prompted. This will then create a partition that fills the disk:
n > p > 2 > enter >enter

Save and exit fdisk:
w

Now reboot. Once rebooted:
resize2fs /dev/mmcblk0p2

Done!